The Universal Asynchronous Receiver / Transmitter (UART) is an embedded communication protocol, which can be used to transfer data between two electronic devices. As the name implies, this protocol is asynchronous, meaning that the sender and receiver does not have to be time synchronised through a dedicated clock signal. Instead, the signal itself is transferring a synchronisation pattern to help the receiver. For communicating from one device to the other, UART requires only one wire. However, since we need bi-directional communication, we need two wires each for sending data in a particular direction.
When you look at a microcontroller that supports UART communication, you will see that there are two dedicated pins called Tx and Rx for this purpose. The Tx pin is used to send asynchronous data from this microcontroller to the outside reicevier. Similarly the Rx pin is used to receive asynchronous data from the outside sender to the microcontroller. When the channel is idle, the UART wires are maintained at HIGH state (logic 1). When some data need to be transmitted, the transmission wire's logic level is pulled down to LOW so that the receiving device know that something is coming through the channel.
The data bits going through UART is organised into a frame structure. A UART frame consists of a start bit, data bits, parity bit, and finally a stop bit. The rate of bits is agreed between the sending and receiving devices by the programmer setting a parameter called baud rate. The are a specific set of baud rates that are usually used for this purpose. The data bits are sent in the order of least significant bit (LSB) first. The start bit is signified by a HIGH to LOW switch in the signal. Similarly, the stop bit is signified by a LOW to HIGH switch. The data bits and parity bit will be represented by either a HIGH or a LOW value depending on whether their values are 1s or 0s.
Let's see some specific real-world example of how UART works in Aruino platform. For this, we will be using a pair of Arduino Uno devices to communicate with each other through their UART ports. Arduino has a serial library to communicate through UART. The following are some specific details related to the Arduino serial library.
- The start bit is 0 during a clock interval.
- The end bit is 1 during a clock interval.
- By default, there is no parity bit. If we want, we can set it to odd or even parity depending on our preference.
- There are 8 data bits.
- The data bits are sent in the least significant bit (LSB) first order.
Let's say we want to send the character 'A' from one Arduino device to which the second device responds with the character 'B'. First of all, let's see how these two characters would be represented in the UART.
Sending character 'A':
ASCII representation: 01000001
LSB-first order: 10000010
[ start bit | data bits | end bit ]
Frame pattern: [ 0 | 10000010 | 1 ]
Sending character 'B':
ASCII representation: 01000010
LSB-first order: 01000010
[ start bit | data bits | end bit ]
Frame pattern: [ 0 | 01000010 | 1 ]
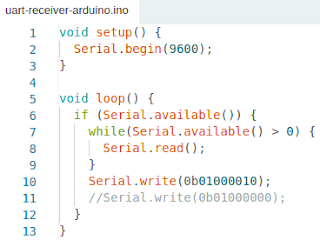
The following two Arduino programs can be used for this purpose.
The two Arduino devices need to be connected with each other through their relevant pins. The Tx pin of the first Arduino should be connected to the Rx pin of the second device. Similarly, the Tx pin of the second Arduino device should be connected with the Rx pin of the first device. Furthermore, we should connect two GND pins of the two devices to have a common ground. The UART communication between these two devices can be observed using a logic analyser. We will connect the ground pin of the logic analyser to one of the GND pins of an Arduino. Then, channel-0 pin of the logic analyser can be connected to the Tx pin of the first Arduino. Similarly, the channel-1 pin of the logic analyser is connected to the Tx pin of the second Arduino. The following picture illustrates this wiring.

Now, let's fire up the Logic 2 program on the host computer to view the data captured by logic analyser on its channel-0 and channel-1 each representing the bits traveled in the Tx pins of each Arduino. The following screenshot illustrates the UART frames went on the two directions. If you watch carefully, you will see that the transmitted bit pattern is equal to the frame patterns that we identified previously for characters 'A' and 'B'.
Let's change the second Arduino's program to send back character '@' instead of 'B'. That means, the bit pattern it sends back has to be different.
Sending character '@':
ASCII representation: 01000000
LSB-first order: 00000010
[ start bit | data bits | end bit ]
Frame pattern: [ 0 | 00000010 | 1 ]
In the program code shown above, there is a commented line representing the way we send character '@' from the second Arduino. This time, when we observe this new response, we will see the following output on the logic analyser window.
This simple demonstration illustrates how data are included in UART communication protocol. By observing the channel using a logic analyser, it is actually possible to view the data being transferred. Let's explore how another embedded communication protocol works in another blog post.


No comments:
Post a Comment