A logic analyser has a collection of input puts through which we can input digital signals. The device would read these pins and transfer the identified digital values to an attached computer. A specialised software running on the computer helps to visualise these data against time. Depending on the features of the software, it would be possible to decode a signal and take any usable data out in addition to simple observation of the signal. The Saleae Logic is such a logic analyser product that has multiple variants. I'm using the 8-channel version of the product that can be used to observe 8 digital signals at the same time. The device can be connected to a computer through the USB port. The host computer can run the official software application provided by the manufacturer, called Logic 2, which can be downloaded from their website (https://www.saleae.com/downloads).
Friday, March 31, 2023
Observing Digital Signals using Logic Analysers
A logic analyser has a collection of input puts through which we can input digital signals. The device would read these pins and transfer the identified digital values to an attached computer. A specialised software running on the computer helps to visualise these data against time. Depending on the features of the software, it would be possible to decode a signal and take any usable data out in addition to simple observation of the signal. The Saleae Logic is such a logic analyser product that has multiple variants. I'm using the 8-channel version of the product that can be used to observe 8 digital signals at the same time. The device can be connected to a computer through the USB port. The host computer can run the official software application provided by the manufacturer, called Logic 2, which can be downloaded from their website (https://www.saleae.com/downloads).
Monday, March 13, 2023
Troubles, Confusion, and Hope
![]() |
| The paddy fields in Thalpavila. |
![]() |
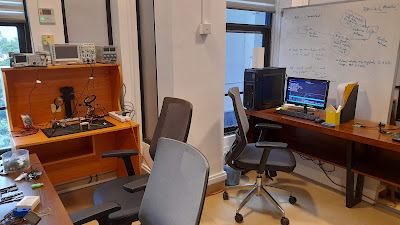
| The lab with new arrangement of equipment. |
In my research, I have been struggling to complete many work I had started since last year. The year 2022 has been mostly occupied with various new administration duties at the university. Due to that, I had less time to make progress in my research, impacting negatively to my profile. This year, I got one paper accepted in MDPI Applied Sciences journal, which was a much needed achievement to start this year 2023. Meanwhile, I'm facing a serious challenge from the ongoing research project funded by Dialog Axiata. The research assistant and the interns assigned to the project were making very little progress in the project, which was very tight in terms of timeline. I was constantly under pressure to move even tiny steps forward in that project's tasks. I think, there is an issue in the way I have been recruiting and managing human resources. This project taught me many lessons on how to manage a project and how to deal with employees. Just throwing people into a project and expecting that they would do a good job on their own is not realistic; as PI, I have to proactively engage and monitor the progress of a project from the beginning.
Saturday, February 4, 2023
Blogging: My Lost Habit
I've used to be a very enthusiastic blog writer over a decade ago. With time, the number of posts I write per year decreased drastically. By the year 2022, I was barely writing a single post — even that's after noticing the risk that I might go without a single post in that year.
![]() |
| The benches at Kyunpook National University (KNU) in Daegu, South Korea. The picture was taken on a Sunday in mid-September, 2013. I was waiting for someone to meet me there. |
In addition to technical posts, I have occasionally written about important events, experiences, and thoughts that I've came across. After several years, these special posts are a pleasure to read; they refresh memories and take me back across time.
So, all these facts points to the importance of keep writing blogs. In this year 2023, I'll restart the blogging habit and try to write as much as possible.
Wednesday, October 5, 2022
Editing Binary Files on Vim Editor
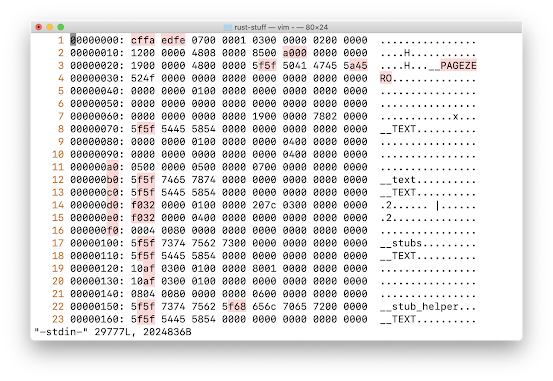
Here's a quick method I use to edit binary files on the vim editor. Suppose that the binary file name that we need to edit is called hello. Let's open it using the xxd hex viewer utility and pipe it to the vim editor as follows using the terminal. This produces the hex view of the binary file on the vim editor.
xxd hello | vim -
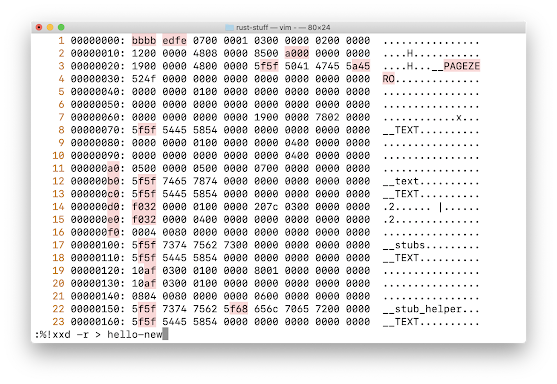
Now, we are good to go with editing the hex values in the file as you would do with any text file on the vim editor. Once we are done with the editing, we can now convert this updated hexdump view on the vim editor back to a new binary file. In order to do that, go to the command mode of the vim editor, and type and enter the following command. It will save the edited binary into a new file; the new file can be named anything while I have made it to be hello-new.%!xxd -r > hello-new
Now, you can safely quit the vim editor with q! on the command mode as you would always quit it. :) Cheers!
References:
[1] https://vi.stackexchange.com/questions/343/how-to-edit-binary-files-with-vim
Tuesday, December 14, 2021
Creating a Window 10 Live USB Stick on an Ubuntu GNU/Linux Computer
As a hardcore user of GNU/Linux systems, I don't usually come across any requirement to use Windows operating system. However recently, I had to install Windows in somebody else's computer as a help. It took me a while to find out how to prepare a installation USB drive for the purpose. Here's the steps I followed, hoping that my future self may need to refer back one day.
1. Download Window 10 ISO file from the official Microsoft website.
2. Download and install WoeUSB-ng on the Ubuntu computer using the information in the following Github page: https://github.com/WoeUSB/WoeUSB-ng
3. Run the following command to make the USB device (/dev/sdb in my case) bootable with the downloaded Windows ISO file. If there are files in the Windows 10 ISO file that are bigger than 4GB, the following command will automatically revert to NTFS format.
Thursday, March 25, 2021
Enabling Hibernation in Ubuntu 20.04 LTS using a Swap File
Enabling of the hibernation option on Ubuntu 20.04 LTS didn't work in the way I used to do. So, I had to explore further and do it slightly differently. This blog post records those things I did to get hibernation option working.
1. First of all, create a swap file using the following commands.
sudo fallocate -l 17G /swapfile
sudo chmod 600 /swapfile
sudo mkswap /swapfile
sudo swapon /swapfile
Once done, add an entry to the end of /etc/fstab file to make use of this swap file as follows.
/swapfile none swap sw 0 0
2. Check the UUID of the partition where the swap file is located using the following command.
cat /etc/fstab
Take note of the UUID string, which we will need in a later step.
3. Check the offset to the swapfile with in the storage device using either of the following commands. Take note of that offset value.
sudo filefrag -v /swapfile | awk '{ if($1=="0:"){print substr($4, 1, length($4)-2)} }'
sudo swap-offset /swapfile
4. Now, open the /etc/default/grub file and add update the correct line as follows.
Original line:
GRUB_CMDLINE_LINUX_DEFAULT="quiet splash"
Updated line:
GRUB_CMDLINE_LINUX_DEFAULT="quiet splash resume=UUID=a27fc21e-3315-4497-99aa-1fe7fad64091 resume_offset=9807872"
Note that the UUID value and the resume offset value are found using the above steps 2 and 3.
Once this grub file is updated, run the following command to take the changes effect.
sudo update-grub
5. Test whether the hibernation option is working now, use either of the following commands. I personally prefer the second command as it provides some verbose output while the system is being hibernated and being resumed later.
sudo systemctl hibernate
sudo pm-hibernate
Cheers!
References:
- https://linuxize.com/post/create-a-linux-swap-file/
- https://askubuntu.com/questions/1240123/how-to-enable-hibernate-option-in-ubuntu-20-04
- https://wiki.archlinux.org/index.php/Power_management/Suspend_and_hibernate#Hibernation_into_swap_file
Tuesday, April 21, 2020
Encrypting Files Using GnuPG
1. If you haven't created your GnuPG key pair yet, you can use the following commands to create them and view their details.
Create a pair of GnuPG keys using the following command.
gpg --gen-key
The keys and their relevant information are stored in .gnupg directory under your home directory. You can view the public keys in your keyring using the following command.
gpg --list-key
You can view the private keys using the following command.
gpg --list-secret-keys
2. Encrypting a file called "private-file.txt" can be done as follows. We can either specify a new name for the encrypted file or GnuPG will automatically name the new file by appending .gpg extension to the name of the plaintext file.
gpg --encrypt --recipient your.email@gdomain.com private-file.txt
gpg --output encrypted.gpg --encrypt --recipient your.email@gdomain.com private-file.txt
3. Decrypting a file called "private-file.txt.gpg" can be done as follows. Similar to the previous case, we can either specify a name for the decrypted file or leave it to the default.
gpg --output private-file.txt --decrypt private-file.txt.gpg
gpg --decrypt encrypted.gpg > private-file.txt
4. Encrypting all the files in a directory can be done as follows.
gpg --encrypt-files --recipient your.email@gdomain.com /path/to/the/directory/*
5. Decrypting all the .gpg files in a particular directory can be done as follows.
gpg --decrypt-files /path/to/the/directory/*.gpg
Resources:
1. https://blog.ghostinthemachines.com/2015/03/01/how-to-use-gpg-command-line/
2. https://www.gnupg.org/gph/en/manual.pdf