Tuesday, December 17, 2013

Processing PDF files in Linux

When preparing research papers on Linux using open source tools such as Latex, sometimes it is necessary to handle files in PDF format. For example, for a research paper submission, I had to attach all the diagrams and graphs included in the paper in a separate annex of the PDF file. However the Latex manuscript wants me to have my diagrams and graphs in EPS file format to be included in the paper. So I had to process the PDF of the paper and the diagrams in EPS format separately and then merge them together. For future usage, I'm noting down the tools I used and how they were utilized. 

When I prepare my diagrams I used DIA tool. Then I exported them as EPS files to be used in the Latex manuscript. If I want to convert such an EPS file to a PDF file, I can easily use a command line tool called "epstopdf". For example, lets say I have a EPS file named as "collision_ratio.eps". I can convert it to PDF format in the command line as follows.

epstopdf collision_ratio.eps

Another new requirement arose after the above conversion. The diagram in the PDF file is smaller and does not fit in to the total A4 page size. So, I wanted to resize it to the A4 size which was done by using "Ghostscript" tool as follows. The input file is "collision_ratio.pdf" and the resulting resized file will be "collision_ratio_A4.pdf".

gs  -sOutputFile=collision_ratio_A4.pdf  -sDEVICE=pdfwrite  -sPAPERSIZE=a4  -dCompatibilityLevel=1.4  -dNOPAUSE  -dBATCH  -dPDFFitPage  collision_ratio.pdf

Finally my requirement was to merge multiple PDF files together and sometimes to rearrange the pages inside the same PDF file accordingly. There are so many open source tools which can be used in Linux to perform such kind of a task. In my case I used a tool called "PDFMod". We can install it on Ubuntu Linux by the following command.

sudo apt-get install pdfmod

This tool is a GUI based tool and therefore users can graphically add many PDF files as possible, rearrange them and finally export the resulting new PDF file. It is a really useful tool for manipulating PDF files. Even though these are the tools I used for my recent work, there are so many other available tools for processing and manipulating PDF files.

Friday, November 29, 2013

Aqua-Sim For Simulating Underwater Acoustic Sensor Networks

When working on terrestrial wireless sensor networks (WSN), we are dealing with electro-magnetic waves to propagate our signals from a sender to a receiver. However, underwater sensor networks are significantly different from their terrestrial counterpart due to the usage of acoustic signals for communication. In underwater environments we are unable to depend on radio signals for communication in long distances since higher attenuation of radio signals when traveling through water. Therefore acoustic signals is the only or most prominent and practical solution so far.

Simulating underwater acoustic sensor networks (UASN) requires special propagation models and other considerations specific to the unique features of acoustic physical medium . Due to this reason, its not possible to simulate UASNs using simulators used for terrestrial WSNs with same configurations. That means we need simulators which specifically support UASNs. Aqua-Sim is such a simulator which is based on NS-2 and therefore I found it easier to use than learning a completely new simulator. Today I installed it and ran a test TCL script to initiate using it for my simulation requirements of UASN. Since its a modified version of standard NS2 simulator, there's nothing new to be done to install it. However since I faced some error during the installation, I decided to write down the steps I followed for future reference.

First I had to download the source files of Aqua-Sim from the following link. At the end of the page pointed by this link, they have provided a download link for 1.0 version of Aqua-Sim. After downloading I extracted the compressed folder to the desktop of my Ubuntu 12.04 system. Entered the following commands in the terminal to install Aqua-Sim on my system.

cd Desktop/Aqua-Sim-1.0/
./install

After running the installation process for a while, suddenly it turned out with an error saying "ld: libotcl.so: hidden symbol `__stack_chk_fail_local' isn't defined". After searching in the web for this error I found the solution mentioned in this blog. According it, I had to edit a configuration file, so I opened the file Aqua-Sim-1.0/otcl-1.12/configure and searched for the line SHLIB_LD="ld -shared" inside it. Then I commented and added a different line as shown below.

#SHLIB_LD="ld -shared"
SHLIB_LD="gcc -shared"

Then I ran the command "./install" again and this time it worked. At the end of the installation process, as usual in NS2 installation, it asked for setting some environmental variables in my system. So I opened the "/etc/profile" file and added the following lines at the end of the existing content and saved.

export PATH=$PATH:/home/asanka/Desktop/Aqua-Sim-1.0/bin:/home/asanka/Desktop/Aqua-Sim-1.0/tcl8.4.13/unix:/home/asanka/Desktop/Aqua-Sim-1.0/tk8.4.13/unix

export LD_LIBRARY_PATH=/home/asanka/Desktop/Aqua-Sim-1.0/otcl-1.12:/home/asanka/Desktop/Aqua-Sim-1.0/lib

export TCL_LIBRARY=/home/asanka/Desktop/Aqua-Sim-1.0/tcl8.4.13/library

Now we are done with installation. Just to make sure that the installation went fine, I ran the validation script as follows. It takes a long time for the validation scripts to complete.

cd Aqua-Sim-1.0/ns-2.30
./validate

After the validation script finished the execution, I ran a sample TCL simulation script as shown below.

cd /ns-2.30/underwatersensor/uw_tcl
ns tmac-example.tcl

This script executed successfully indicating that everything is OK and Aqua-Sim is ready for my future simulations of UASN networks. Cheers!

Wednesday, November 6, 2013

Invited talk of Professor C. K. Toh at DGIST

Professor C. K. Toh
At the end of last month, I got a chance to attend to an interesting talk conducted by Professor C. K. Toh from National Tsing Hua University in Taiwan. In his visit to Korea, he conducted this invited talk at the DGIST (Daegu Gyeongbook Institute of Science and Technology) where I got the opportunity to attend with my lab mates. Professor C. K. Toh is a collaborator and an advisor to our Monet research lab and therefore he is more important to us. However it was the first time I met him in person. The topic of his talk was "The Green Internet" where he talked about the modern trends he observed in the Internet and how it is going to effect the energy crisis of our century. DGIST institute is located in a beautiful place in Daegu, far away from the main city area. It took nearly an hour for us to drive to their place. In addition to us from Monet lab in KNU, there were some other attendees mainly from DGIST itself.

My lab mates and me in front of DGIST building
In his talk, Professor Toh showed how our modern Internet is going to face a challenge from the energy crisis. The number of users of Internet is rapidly increasing and therefore the number of computers connected to the Internet is also increasing. Due to this always connected nature of the Internet, users expect all the network resources to be available anytime anywhere. Data centers has to run 24/7 making them consume power always. Almost all the networked devices including user PCs, routers and servers are powered on all the time even when nobody is using them. The ultimate result of this trend is a huge energy crisis in the near future due to the Internet. He showed that as the Internet bill, actually what we are paying is mainly an energy bill. When the energy consumed to run the Internet infrastructure gets increased, the cost for Internet access also can go higher. In conclusion, he suggests to take proactive actions to reduce the excess energy wasted on Internet related devices. One simple suggestion is to turn of the computers when not in use. He suggested some more interesting ideas as solutions for this issue.

After his lecture we all had lunch with him. He has got his PhD from  University of Cambridge. I didn't know that he is such a giant in the field until I read his profile. He has even worked on some DARPA research projects.
 

Sunday, October 27, 2013

"Incredibly Exciting Thing, This One, Meaningless Life"

Dreams were my driving force. Still they are. Recently I came across a wonderful speech which caused an intellectual quest inside my head about what I'm really doing. At first, I thought it is a challenge to me just like a revolver pointed right on to my head. After reading it again and again, I realized its not such a challenge. It's a wonderful attitude of a wonderful guy which asked me to revise my own attitudes. He is correct at some points according to my own attitudes and he is absolutely wrong at some other points according to my own point of view. Anyway it is such a beautiful speech which deserve my own attention.

Tim Minchin is an Australian artist. He must be a very famous guy I guess, even though I hadn't hear much information about him. Oh, poor me. Anyway, very recently, he attended to a graduation ceremony and delivered an amazing speech at University of Western Australia. First of all, I have to mention that he speaks in a so beautiful way. Its really attractive whatever he say. Secondly I have to accept that I got shocked at some points in the middle of his speech. Some ideas he expressed in his speech challenged my own perspective about life. It caused me to rethink and be prepared to adjust anything that could have gone wrong in my life. So, here we go.

Among the life lessons he mentioned, I'm starting from the points which I agree and which I consider so beautiful. Minchin says, "Happiness is like an orgasm: if you think about it too much, it goes away. Keep busy and aim to make someone else happy, and you might find you get some as a side effect". This is really the definition of happiness. Throughout the past two decades I've realized that happiness is not about doing things which generates it on my own. Happiness is about making others happy. Specially the people who really cares you, the people who are ready to loss their own self for your own good. They will do everything they can to keep you happy and alive. So, they deserve your care and sacrifices to maintain their happiness. When you see they are happy, you will realize that you are happy too. That's the ultimate happiness. The selfless happiness. At some other point, Minchin expresses about the definition of our own self. He says, "Define yourself by what you love". I truely believe him in this point. I always prefer to define myself by what I really love to do. That's where I put my genuine effort, my sweat, my tears and everything I have. I always tried to do things which I really love to do. So, thats the way I can define myself, who I am, whom I really want to be and how I should get there. I'm with Minchin in there in that point.

Now it's time to talk about the things which challenged me, which shocked me and pushed me to an intellectual quest. Minchin said in his speech that, "You don't have to have a dream". The way he elaborated his view convinced me like those who have big dreams are crazy and just wasting their short lifetime. Well, I'm a dreamer. I make progress in my life by trying to chase dreams. Sometimes I succeeded and sometimes I failed. But I never blamed my dreams. They were with me almost all the time of my life. Sometimes they were with me even when nobody else was. They have been dragging me so far in life which makes me face so many challenges. Sometimes they makes me tired. Sometimes they makes me fall down and even cry. But they sit besides me until I wipe the tears, take a long breath and start moving again. So, I have a great respect on my dreams. Sometimes they are the only hope. I will keep them, feed them and love them. They will not leave me alone when I fall down next time in the battle field of life.

So, in conclusion, thank you Tim Minchin for this wonderful speech. Its truly wonderful, incredible and enlightening. Its true that there are some places where I don't agree with you. But your speech really deserve my time. He says at the end, "It’s an incredibly exciting thing, this one, meaningless life of yours". Of course, its an incredibly exiting thing, this life. And yes its truly meaningless since we are a result of random events occurred in the universe for millions and billions of years. But still, I believe its worth searching for a meaning, chasing dreams until oneday I fail, fall down and die somewhere in this universe. That might be the meaning of my life. Nobody knows. Perhaps I will never know.

Tuesday, October 8, 2013

Wandering around: what life has to offer?

I'm in almost the same place. Same milky way  galaxy, same solar system, same planet. But in a different country. Far away from the home which I considered as my own place. After being here more than half of a year, today, at this particular point of time, when I stop everything and turn back to see what happened so far, I see some great insight. During last seven months, I forgot lot of good things which I used to practice for many years. There was a time I used to day dream a lot. At home I usually walk here and there from living room to the kitchen, from front door to the rear door thinking about so many crazy things. May be I have walked so many kilometers inside our home a day. I used to read a lot of books. They helped me to improve the quality of my day dreams. They added good ingredients to life. But suddenly I quit living that life and stayed alive for about seven months .

image credit: Udaya Wijenayake
During this time period I could not find time to walk around day dreaming for hours. Everything is scheduled. Wakeup, have breakfast, goto lab, lunch time, dinner time, come back to dormitory and goto sleep. Everything has a specified time. I'm not used to follow these time tables which are virtually unbreakable. At home I used to hold my plate during lunch for more than an hour since I was thinking while eating. I used to stand under the shower for a long time keep thinking. How much wonderful the day dreaming was. I made a mistake by quitting it. Now I know I have initiated to roll back. Back to the mysterious world of day dreaming. Whatever the reasons are, back to the dream world is good. It feels good. Its not easy to find time for that. So I do it all the time. The ingredients provider has started the service again. I'm reading books again. Not just the research papers like last seven months. I read good books. Good as a good book can be. Besides that, the most important function is started now. Let me try to tell you how it feels. 

About a week ago, we had a holiday. That's last Thursday. I couldn't find any enjoyable plan to spend that holiday. After different failures, finally I had the only choice that is going for a ride. A ride on my bicycle. Just me and the bicycle. On that day I woke up late at the lunch time. Had the lunch from dormitory cafeteria, took the bike and left. In my backpack there was a really good book. The book I'm still reading these days. My plan was simple. Go to the river side near the university, ride the bicycle in the track along the river and when I get tired, sit down on a bench and read the book until the stars appear and ask me to go home. However the plan started to shift away from the very beginning. Riding the bicycle along side the river felt so joyful than ever. From one side, the river that flows so calmly. Ahead, the never ending bicycle track. All over I see mountains, trees, and the clear blue sky above me. The faster I ride, the cooler the river side breeze which washed my face. There was nothing to stop me from keep moving. So, I kept moving, riding like crazy.

Carl Sagan once said, "We began as wanderers and we are wanderers still". I was wandering without a hope for no particular destination. I didn't know when I will fed up, when my legs start to hurt and ask me to stop moving. I didn't know when I should turn back and get to home. I just knew that there is a long way ahead and I can try to move a little bit more before I fed up of this long way joyful campaign. For a long time I wondered what life has to offer. What it will bring up finally. Its always the curiosity and uncertainty what fills our lives. There's nothing for sure. We just see the blue sky, the surrounding mountains, the long way ahead and the memories of our starting position of this journey. Whatever the decisions we make either to keep moving ahead hoping for the best or to turn back and go to the beginning is totally based on the limited information we have at the moment. But most importantly, whatever the decision we made, we should have the courage to stand by it without giving up easily. The situations can be really unfavorable for keep moving. But still its worth keep moving until we are really sure that it's time to give up and turn back.

image credit: Udaya Wijenayake
Anyway, this lonely voyage didn't last longer. Suddenly I got a message from Udaya Aiya who is a senior and a close friend of me. He was worrying where I was and then he decided to join the journey. Within the next half an hour, he arrived with his bicycle. Then Pathum joined. Finally Nadee akka. Together we all, traveled a long way. It was so much an exciting experience. We decided to turn back and go home when it was darkness all over, leaving the distant stars staring at us. I returned to the dormitory but not as the person who left in the lunch time. My mind was full of fresh thoughts and great insights into life which I collected from the cool breeze of river side. I hope they will last long with me in the voyage of life. 

- -------------------- -

Sunday, September 8, 2013

Working with Android NDK applications

I wanted to try some native applications on Android recently and it was a mystery to me for several days. Something was missing. Finally, I clearly understood the way to compile and run JNI based Android applications. So, here's the procedure I followed to try a sample native application on Android. I assume that we already have Android SDK, and also installed the Android ADT plagin for Eclipse.

First of all we need C/C++ support on Eclipse IDE. To install it on Eclipse, we goto the menu bar.
Help -> Install New Software...
In the pop up window, enter the name as CDT. For the USR, add the following URL.
Now Eclipse can compile C/C++ applications.

Second step is we need Android NDK. So, download it from the following place.
Extract the downloaded compressed directory and save the folder somewhere most probably in the same directory where your Android SDK folder is. Now we are ready to try some example native application. There are some good native application samples in the downloaded NDK directory. We are going to use the native-activity example in the "android-ndk-r9/samples/native-activity" directory.

Move into that directory from the terminal. We need to run a tool called ndk-build within this directory. This tool is in the "android-ndk-r9/ndk-build" directory. So while in the native app directory, we run that tool by providing the absolute or relative path.

/path-to-ndk-folder/android-ndk-r9/ndk-build

When this tool is running, it will print some output on the screen and then it will exit.
This tool is compile and build the C based codes of the native app. Now we can use this app on the Eclipse IDE. So, go back to Eclipse IDE.

File -> Import... -> Existing Android code Into Workspace -> Next

Now browse and select the "android-ndk-r9/samples/native-activity" directory. Put the tick for "Copy projects into the workspace". Then  click "Finish". 
Now right-click on the project folder in navigator of eclipse and "Run As" android application.

Done!!!

Thursday, August 22, 2013

Installing and running Antidote IEEE 11073 library for personal healthcare device systems


When comes to personal health care device systems, a major problem which can occur is the incompatibility between different devices manufactured by different vendors. The obvious solution is the standardization. So, IEEE has defined the IEEE 11073 protocol for personal health device communication. Antidote is an open source library which implements this protocol for using in such personal health device systems. Recently I got a chance to try this implementation and find out how it works. As usual, for the sake of not forgetting the steps I followed, I'm writing down everything here.

To test Antidote with the sample Agent and Manager components, we need two computers with the bluetooth capability. So, I used my desktop PC which is connected with a USB bluetooth adapter and a laptop which has bluetooth capability. Both are running Ubuntu 12.04 version. I performed following steps on the desktop PC which is going to run the Manager component.

First of all, download Antidote 2.0 version from their website. After uncompressing it to somewhere in my Ubuntu 12.04 desktop machine, I started the installation process. When I try to install it, there were many error messages about missing packages in my platform. So, before installing Antidote, we have to issue following commands on the terminal to install those required package tools.

sudo apt-get install automake
sudo apt-get install libtool
sudo apt-get install libdbus-1-dev
sudo apt-get install libdbus-glib-1-dev
sudo apt-get install libusb-1.0-0-dev


After completing their installation, we can proceed to install Antidote. Move into the antidote-2.0.0 directory from the terminal and issue following commands.

./autogen.sh
./configure
make
sudo make install


Now Antidote installation on desktop machine is complete. I have to follow the same steps to install Antidote on the laptop but first I have to fix a little bug. After downloading Antidote to the laptop which is also running Ubuntu 12.04, I opened the file "antidote-2.0.0/src/communication/plugin/bluez/plugin_bluez.c" and commented the line number 1455 which is a call to "channel_connected" function. This is required to solve some problem occured by Agent program in Antidote. I found this solution in this mailing list discussion. After doing this little fix, then followed all the above instructions to install Antidote on the laptop computer too.

After completing the installation, we can try sample applications. In the IEEE 11073, there are two basic components which are Agent and Manager. Agent is the medical device which generate health-care data. Manager is a user device which collects the data from Agent device and provide some useful functionalities for the user such as visualizing and storing data or send to some other remote application. Manager device can be a smart-phone or a tablet, while Agent device will be a medical equipment which generate data. Agent and Manager communicates to each other via Bluetooth HDP profile. In our case, we are going to run a simple Manager program on desktop computer while the simple Agent program will run on the laptop computer(which has the bug fixed Antidote). Agent will send just dummy data to the manager to demonstrate the functionality.

First of all we must run the manager. For this purpose move in to the "antidote-2.0.0/src" directory from the terminal of desktop computer. Now issue the following command.

./healthd

Our terminal should now print some stuff and then hangout. Open a new terminal or a tab and then move into the same directory. Now issue the following command.

python test_healthd.py

That healthd program and this python script are collectively going to give us the Manager functionality. Now its time to run the Agent on the laptop computer. Before that, turn on wifi in both computers and then pair them. Now in the laptop computer, open a terminal and move into the directory "antidote-2.0.0/src" and issue the following command. Note that we have given the bluetooth address of the desktop computer running Manager as a parameter to this sample Agent program.

./sample_bt_agent 00:19:0E:11:9F:5D

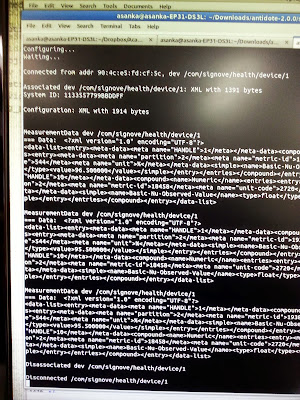
After issuing this command, sample Agent start to communicate with the Manager program via bluetooth HDP with the help of IEEE 11073 protocol. On the desktop computer where the test_healthd.py script is running, you will see some output like the following which shows that Manager has received some dummy data from the Agent. When we get this output that means our Agent and Manager are working fine.

This is the very basic level of Antidote Agent and Manager for testing. There are more things for me to learn about Antidote library.

Thursday, August 8, 2013

On Screen Keyboard for Raspberry Pi

I faced a little difficulty with the limited number of USB ports available on Raspberry Pi. I wanted to test a USB bluetooth adapter on a Raspberry Pi and obviously I wanted the keyboard and mouse connected to it at the same time. So, I needed 3 USB ports but there are only 2 ports available. One option was to use a USB hub. However when using a USB hub, it seemed my bluetooth adapter is not working as expected which I guess due to low amount of current it can drag through the USB hub. Anyway, I had to look for a solution and there is a simple solution.

I searched in the web for a on-screen keyboard for Raspberry Pi and found this thread. I tried it and worked fine. I'm writing down it here in case I need to do such a thing again oneday. I installed the on-screen keyboard program by issuing the following command in the terminal.

sudo apt-get install matchbox-keyboard

After it completed the installation, we can start it by typing the following in the terminal. The reason is, there is no any launcher icon coming to the desktop or anywhere. Therefore we have to launch it from the command line.

sudo matchbox-keyboard

However its obvious that we cannot have a hardware keyboard to type that command in the terminal in each time we need a keyboard. So, we need a launcher icon. So, we have to add a desktop shortcut for launching the on-screen keyboard. For that, as instructed in that thread, I created a file in the desktop and named it keyboard.sh (name can be anything). In the file I added the following.

#!/bin/bash
matchbox-keyboard

When we double click it, this shell script should run. For that we have to set the executable permission for this file. So, from the terminal, I went to the desktop where this file is saved and issued the following command.

chmod +x keyboard.sh

 Now, when we double click on the file in the desktop, a pop up message should come asking what to do. One option should be to run the file as an executable. By selecting that option, our on-screen keyboard should launch.

Friday, July 19, 2013

Algorithms in IEEE latex paper manuscripts

While preparing a manuscript on a IEEE latex paper template, I wanted to add a pseudo code of an algorithm to it. I write it down here to avoid forgetting it and also for the benefit of somebody somewhere in this world.

First of all I should have installed the full package of latex on my Ubuntu 12.04 machine to avoid the problems of different missing packages. I do it by the following command.

sudo apt-get install texlive-full

For preparing the manuscript I used the bare_conf.tex file coming with the latex templates which can be downloaded from IEEE website here. So, following commands should be added to that file in the appropriate places to make an example algorithm.

1:  \usepackage{algpseudocode}  
2:    
3:  \begin{figure}  
4:  \begin{algorithmic}[1]  
5:  \Procedure{Euclid}{$a,b$}\Comment{The g.c.d. of a and b}  
6:  \State $r\gets a\bmod b$  
7:  \While{$r\not=0$}\Comment{We have the answer if r is 0}  
8:  \State $a\gets b$  
9:  \State $b\gets r$  
10:  \State $r\gets a\bmod b$  
11:  \EndWhile\label{euclidendwhile}  
12:  \State \textbf{return} $b$\Comment{The gcd is b}  
13:  \EndProcedure  
14:  \end{algorithmic}  
15:  \caption{Euclid's algorithm}  
16:  \label{euclid}  
17:  \end{figure}

After this if we generate the PDF file, our algorithm should appear in the paper like the following.


So, have a nice time with preparing research papers!


Monday, July 8, 2013

Transferring files via bluetooth using python scripts

In a previous post, I wrote about bluetooth programming using python. A library called BlueZ is used for that. We can do various things including client-server programs using that library. However, today I had a requirement to send or receive a file from a python script via bluetooth. As usual I started to search through the web until I find some way. Finally I came through a solution. A python library called lightblue can be used for this task. So, I'm writing down the basics I learned today about file transferring via bluetooth.

First of all, we need to download the lightblue library from the website http://lightblue.sourceforge.net/. It's scary to see the notice "This project is no longer maintained" in the website but thankfully it worked for me. I'm running Ubuntu 12.04 in my machine. Download the file "lightblue-0.4.tar.gz" and uncompress it. Now move into it from the terminal. We need to install some packages before installing the library. Issue the following commands for that purpose.

sudo apt-get install libopenobex1-dev
sudo apt-get install bluez
sudo apt-get install python-bluez libbluetooth-dev python-dev

Now, issue the following command to install the downloaded library.

sudo python setup.py install

If everything goes fine, we can start programming. Save the following program as lightblue_test.py in your machine. The variable "target_name" should contain the name of the bluetooth device we are going to connect to. "file_to_send" variable should contain the path to the file which we are going to send. 

1:  import bluetooth  
2:  import lightblue  
3:    
4:  # we should know  
5:  target_name = "SHV-E210K"  
6:  file_to_send = "/home/asanka/Downloads/20130621_151742.jpg"  
7:    
8:  # we don't know yet  
9:  obex_port = None                 
10:  target_address = None  
11:    
12:  print "searching for nearby devices..."  
13:  nearby_devices = bluetooth.discover_devices()  
14:    
15:  for bdaddr in nearby_devices:  
16:    print bluetooth.lookup_name( bdaddr )  
17:    if target_name == bluetooth.lookup_name( bdaddr ):  
18:       print "found the target device!"  
19:      target_address = bdaddr  
20:      break  
21:    
22:  print "searching for the object push service..."  
23:  services = lightblue.findservices(target_address)  
24:  for service in services:  
25:       if service[2] == "OBEX Object Push":  
26:            obex_port = service[1]       
27:            print "OK, service '", service[2], "' is in port", service[1], "!"  
28:            break  
29:    
30:  print "sending a file..."  
31:  try:  
32:       lightblue.obex.sendfile( target_address, service[1], file_to_send )  
33:       print "completed!\n"  
34:  except:  
35:       print "an error occurred while sending file\n"  

Before running this program, we need to pair the two devices. For example since I'm going to send a file from my linux PC to an Android smart-phone, I paired the PC and Android phone first. Then issue the following command to run the script.

python lightblue_test.py

Some of the basic examples are available in the lightblue library website. I referred some other websites which are listed below to solve some issues I faced during this work.

http://bayo.opadeyi.net/2009/08/bluetooth-file-transfer-with-pybluez.html

https://code.google.com/p/bluespam/

https://groups.google.com/forum/#!msg/pybluez/XrPgYLeDej4/2Uf8za3oM4cJ

I didn't move into try file receiving functionality, however I hope it is also working properly. So far, this is all I know about file transferring via bluetooth using python.

Thursday, June 27, 2013

Using rtimer in Contiki for more accurate timing

In contiki programs, the usage of rtimer is important when we need a real-time functionality. While having different kinds of timers such as ctimer and etimer, the most accurate timing can be achieved by using rtimer. Recently had such a requirement where my program should have very accurate timing. So, I learned about rtimer and used it in my program. For the sake of remembering it, I'm writing down a simple program which use rtimer.

The program shown below is a modified version of the hellow-world program which is in /contiki-2.6/examples/hello-world directory. Therefore I can run it just by issuing the following command in terminal inside that directory.

make TARGET=cooja hello-world

1:  #include "contiki.h"  
2:  #include <stdio.h>  
3:  #include "sys/rtimer.h"  
4:  #define     PERIOD_T     5*RTIMER_SECOND  
5:    
6:  static struct rtimer my_timer;  
7:    
8:  PROCESS(hello_world_process, "Hello world process");  
9:  AUTOSTART_PROCESSES(&hello_world_process);  
10:    
11:  // the function which gets called each time the rtimer triggers  
12:  static char periodic_rtimer(struct rtimer *rt, void* ptr){  
13:    uint8_t ret;  
14:    rtimer_clock_t time_now = RTIMER_NOW();  
15:    
16:    printf("Hello from rtimer!!!\n");  
17:    
18:    ret = rtimer_set(&my_timer, time_now + PERIOD_T, 1,   
19:          (void (*)(struct rtimer *, void *))periodic_rtimer, NULL);  
20:    if(ret){  
21:     printf("Error Timer: %u\n", ret);  
22:    }  
23:    return 1;  
24:  }  
25:    
26:  PROCESS_THREAD(hello_world_process, ev, data)  
27:  {  
28:   PROCESS_BEGIN();  
29:    
30:   printf("Starting the application...\n");  
31:    
32:   periodic_rtimer(&my_timer, NULL);  
33:    
34:   while(1){             
35:    PROCESS_YIELD();  
36:   }  
37:   PROCESS_END();  
38:  }  

Our program will keep printing Hello from rtimer!!! as the output.

Saturday, June 15, 2013

Bluetooth Programming On Linux


Sometimes we need to write programs that run on a PC and communicate with an external bluetooth capable device such as a smartphone. In such cases we need some good programming library which provide the necessary capabilities to access bluetooth hardware components in our PC easily. While looking for a good programming library for this task I came across a library called Bluez. It seems it has been widely used for Bluetooth programming in linux based environments. So, I decided to take a look at it.

I tried it on a Ubuntu 12.04 system connected with a USB Bluetooth adaptor. First thing is to install the necessary packages. Give following commands to install those packages.

sudo apt-get install bluez
sudo apt-get install python-bluez

After these library packages completes the installation, we will first check whether our hardware setup works. Connect the bluetooth adaptor to the USB port and turn On bluetooth. I had some problems with the default bluetooth manager that comes with Ubuntu 12.04 as I mentioned in my previous post. Therefore I use Blueman bluetooth manager to turn on/off and do anything with bluetooth on my PC.

After turning bluetooth ON, first I checked whether every thing's fine by pairing my PC with a smartphone and sending and receiving some files. Then it's time to check our Bluez libray. Put the following code in the text editor and save as bluez_test.py somewhere in the file system.

1:  import bluetooth  
2:  target_name = "SHV-E210K"  
3:  target_address = None  
4:  nearby_devices = bluetooth.discover_devices()  
5:  for bdaddr in nearby_devices:  
6:    print bluetooth.lookup_name( bdaddr )  
7:    if target_name == bluetooth.lookup_name( bdaddr ):  
8:      target_address = bdaddr  
9:      break  
10:  if target_address is not None:  
11:    print "found target bluetooth device with address ", target_address  
12:  else:  
13:    print "could not find target bluetooth device nearby"  

Please note that the target name variable is set to the name of the external bluetooth device we are going to connect. "SHV-E210K" was the name of my smartphone for bluetooth connection. According to the program, it print the names of available Bluetooth devices around and check whether our target device is available.

Now go to the location of the file from terminal and issue following command to run the python program. 

sudo python bluez_test.py


If every thing is fine, it should print that target device is found just like the one shown above. That means simply our Bluez library is capable of accessing the Bluetooth adaptor and using it. Following link will be a good reference for learning to use Bluez library.

Reference:

Enjoy with Bluetooth  programming on Linux! :)

Wednesday, June 12, 2013

Problem of sending files from Android smartphones to Ubuntu 12.04 via Bluetooth

Recently I wanted to check a USB bluetooth adaptor on a Ubuntu 12.04 system. I plugged the adapter to machine and paired it with a Galaxy S3 smart-phone. Sending files from Ubuntu machine to smart-phone works fine with the default bluetooth application that comes with Ubuntu 12.04.  However when sending files from the phone to the machine, a failure message is shown in phone and Ubuntu system does not notice any incoming file from the paired device.

I searched in web and found that many people have faced this problem. I tried the solution suggested in this link [http://askubuntu.com/questions/211006/unable-to-transfer-file-via-bluetooth-from-android-phone]. According to that, instead of using default bluetooth application, I installed Blueman Bluetooth Manager from software center. Now, sending files from Ubuntu to Android and Android to Ubuntu works fine.

Friday, March 22, 2013

The NS-3 simulator

While the NS-2 is the most widely used simulator for research works in the literature, a newer simulator is now under rapid development. That is NS-3 simulator. Initially I thought NS-3 is a newer version of NS-2 but it is a misunderstanding. NS-3 is a complete new implementation from scratch to suit the requirements of modern network simulations.  It is said that NS-3 is more maintainable and easily extendable comparing to old NS-2 because of it's sophisticated design. Anyway in the future most probably NS-2 will go deprecated and NS-3 simulator will take the lead. Therefore it is better to have some hands on experiences in NS-3 simulator.

To try NS-3 simulator, I installed it on Ubuntu 12.04 LTS and tried some example applications. Since NS-3 is written completely on C++, it seems it is convenient to read though the source code and explore it's implementation comparing to NS-2 which is implemented using C++ and OTcl. In the following paragraphs I'm writing down the steps I followed to install and try NS-3 simulator.
Figure - 1


Download the latest release of NS-3 as a tarball file from the link - http://www.nsnam.org/releases/. Uncompress it to a new directory in your home directory and go in to it from a terminal. In the content of the uncompressed file you should see the file named as build.py which is going to be used for building our NS-3 source code.

Issue the following command to install some necessary packages before we build NS-3.

    sudo apt-get install build-essential

Then issue the following command to build NS-3.

    ./build.py --enable-examples --enable-tests

Now some processing will take place and finally it should say that 'build' finished successfully. Now move it to the ns-3.1x directory inside the uncompressed directory where you would find the file test.py. This script will be used to run some tests on NS-3 to make sure all the modules are working as expected. So, issued the following command to run those tests.

     ./test.py -c core

 After completing those tests successfully, we can try some example scripts in NS-3 to learn how to build and run scripts in NS-3. So, while staying in the  ns-3.1x directory, issue the following command to copy the hello-simulator script to a new place where we will try those examples.

    cp examples/tutorial/hello-simulator.cc scratch/myhello.cc

Now issue the following commands to build and run this script.

    ./waf

    ./waf --run myhello

So, in the terminal you should see the output of this myhello script as Hello Simulator. That is the very first example we ran on NS-3. Now issue the following command to copy another example scripts to our working place.

    cp examples/tutorial/first.cc scratch/my-point-to-point.cc

This example script creates a sever and a client in the simulation and send a packet from the client to the server. Server replies with the echo of the same packet it received from the client. If you open the file my-point-to-point.cc and it won't be hard to understand how it works.

1:  #include "ns3/core-module.h"  
2:  #include "ns3/network-module.h"  
3:  #include "ns3/internet-module.h"  
4:  #include "ns3/point-to-point-module.h"  
5:  #include "ns3/applications-module.h"  
6:  using namespace ns3;  
7:  NS_LOG_COMPONENT_DEFINE ("FirstScriptExample");  
8:  int  
9:  main (int argc, char *argv[])  
10:  {  
11:   LogComponentEnable ("UdpEchoClientApplication", LOG_LEVEL_INFO);  
12:   LogComponentEnable ("UdpEchoServerApplication", LOG_LEVEL_INFO);  
13:   NodeContainer nodes;  
14:   nodes.Create (2);  
15:   PointToPointHelper pointToPoint;  
16:   pointToPoint.SetDeviceAttribute ("DataRate", StringValue ("5Mbps"));  
17:   pointToPoint.SetChannelAttribute ("Delay", StringValue ("2ms"));  
18:   NetDeviceContainer devices;  
19:   devices = pointToPoint.Install (nodes);  
20:   InternetStackHelper stack;  
21:   stack.Install (nodes);  
22:   Ipv4AddressHelper address;  
23:   address.SetBase ("10.1.1.0", "255.255.255.0");  
24:   Ipv4InterfaceContainer interfaces = address.Assign (devices);  
25:   UdpEchoServerHelper echoServer (9);  
26:   ApplicationContainer serverApps = echoServer.Install (nodes.Get (1));  
27:   serverApps.Start (Seconds (1.0));  
28:   serverApps.Stop (Seconds (10.0));  
29:   UdpEchoClientHelper echoClient (interfaces.GetAddress (1), 9);  
30:   echoClient.SetAttribute ("MaxPackets", UintegerValue (1));  
31:   echoClient.SetAttribute ("Interval", TimeValue (Seconds (1.0)));  
32:   echoClient.SetAttribute ("PacketSize", UintegerValue (1024));  
33:   ApplicationContainer clientApps = echoClient.Install (nodes.Get (0));  
34:   clientApps.Start (Seconds (2.0));  
35:   clientApps.Stop (Seconds (10.0));  
36:   Simulator::Run ();  
37:   Simulator::Destroy ();  
38:   return 0;  
39:  }  

This simulation creates a topology as shown in the Figure-1. You can run this application similarly to the previous example by running the following commands.

    ./waf
    ./waf --run scratch/my-point-to-point

That's it. This is the beginning and I need to learn more things in NS-3 simulator in the near future. Most importantly I need to explore how we use it to simulate wireless networks.

Wednesday, March 20, 2013

System Programming: From Exciting World of Linux to (exciting ??) World of Windows

I was a Linux lover for a long time and used to do everything on Linux in my university academic works and research works back in Sri Lanka. However after moving to my new university, things changed so rapidly. Our research group is working mostly on Windows platform and therefore it is better for me to work on Windows just like others. In this way it's easier to work together.


So, now I'm running on Windows 7. Initially it wasn't easy for me to adapt but now I'm feeling comfortable on Windows. In this very first semester there is a course on System Programming on Windows. Well, I have done so much system programming on Linux but Windows is new to me. So, I decided to take the course and see.

In this course we are using the same C compiler which comes bundled with MS Visual Studio but without using the high-level application frameworks we are writing codes directly using Windows API. This way we get the understanding about the internal architecture and functionality of Windows OS.

Here's how we create a new copy of a file using Windows API. Of course I have used some standard C library functions (i.e- printf() ) inside the code but if we want we can write those functionality also using much lower Windows API.

1:  /* Basic cp file copy program                */  
2:  /* cpW file1 file2: Copy file1 to file2           */  
3:  #include <windows.h> /* Always required for Windows */  
4:  #include <stdio.h>  
5:  #define BUF_SIZE 256 /* Increase for faster copy */  
6:  int main(int argc, LPTSTR argv [])  
7:  {  
8:       HANDLE hIn, hOut; /* Input and output handles */  
9:       DWORD nIn, nOut; /* Number bytes transferred */  
10:       CHAR Buffer[BUF_SIZE];  
11:       if (argc != 3) {  
12:            printf ("Usage: cp file1 file2\n");  
13:            return 1;  
14:  }  
15:  /* Create handles for reading and writing. Many     */  
16:  /*     default values are used                */  
17:  hIn = CreateFile (argv[1], GENERIC_READ, 0, NULL,  
18:       OPEN_EXISTING, FILE_ATTRIBUTE_NORMAL, NULL);  
19:  if (hIn == INVALID_HANDLE_VALUE) {  
20:       printf ("Cannot open input file\n");  
21:       return 2;  
22:  }  
23:  hOut = CreateFile (argv[2], GENERIC_WRITE, 0, NULL,  
24:       CREATE_ALWAYS, FILE_ATTRIBUTE_NORMAL, NULL);  
25:  if (hOut == INVALID_HANDLE_VALUE) {  
26:       printf ("Cannot open output file\n");  
27:       return 3;  
28:  }  
29:  /*     Input and output file handles are open.     */  
30:  /*     Copy file. Note end-of-file detection      */  
31:  while (ReadFile (hIn, Buffer, BUF_SIZE,     &nIn, NULL) && nIn > 0)  
32:       WriteFile (hOut, Buffer, nIn, &nOut, NULL);  
33:  /*     Deallocate resources, such as open handles */  
34:       CloseHandle (hIn); CloseHandle (hOut);  
35:       return 0;  
36:  }  

Save this file as cpW.c in somewhere in your home directory. Additionally create a text file (eg- file1.txt) in the same place with some content. Open the Visual Studio command prompt and go to the place where these files are saved. Issue the following command to compile the program.

               cl cpW.c

Now there should be a file as cpW.exe in that directory. You can use that executable to create a new copy of our text file. Let's do that by using following way.

               cpW file1.txt file2.txt

Now you will find the new text file file2.txt in the same directory with the same content of the first file. This is the very first program I had to write using Windows API. More interesting things will come ahead of time.

I will write those new things I learn on Windows API in the future.


Tuesday, March 5, 2013

Towards Intelligent Transportation Systems (ITS)

Day by day, the amount of vehicles in the roads is increasing. Proportionally to it, the amount of road side accidents and the traffic jams are increasing. Those traditional traffic controlling mechanisms, rules and regulations are unable to control this increasing issue anymore. This is where the need for intelligent transportation systems arise. We need smarter ways to coordinate vehicles on the road so that our transportation system becomes more efficient, safe and human friendly.

Vehicles mounted with sensors and wireless communication units are such a way towards implementing intelligent transportation systems. While moving on the road these vehicles can exchange valuable information to supplement safe and efficient driving. In addition to the vehicles, some base station units mounted in road sides can provide and gather information. These kinds of networks builds the new research field called Vehicular Ad-hoc Networks (VANET) which is a special case of the Mobile Ad-hoc Networks (MANET). VANETs differ from MANETs in various ways. One important aspect is the high mobility of nodes in vehicular networks since motor vehicles are moving so fast from each other on the road. VANETs differ from Wireless Sensor Networks (WSN) since VANET nodes virtually does not suffer from any resource constraint since power and hardware resources are easily available to nodes mounted in automobiles.

A key challenge faced by VANET researchers is how to provide communication links between vehicles as they are travelling very fast from each other on the road. As an example when two vehicles move to opposite directions passing each other at a high speed, the amount of time they are in each others wireless transmission range can be few seconds or less. Therefore if messages has to be passed from one to another, it should be done so quickly. But in traditional wireless networks, the connection establishment take some considerable time which is not acceptable in VANET scenarios. For example if the network uses IEEE 802.11 for communication, the two vehicles might not be able set up the connection before they go far away from the transmission ranges of each other.

On addressing these issues, researchers have made some improvements to the above standard which is considered as IEEE 802.11p and it is specifically designed to cope with high node mobility condition in VANETs. Another standard called IEEE 1609 is also have introduced which runs on top of IEEE 802.11p layer to provide further necessary functionality for IEEE 802.11p protocol. Altogether we call this WAVE (Wireless Access in Vehicular Environments) protocol. There are lot of active research going on in this area, so we can hope we will have VANET equipped automobiles in our roads in the near future.

Saturday, March 2, 2013

Entered to Kyungpook National University (KNU)

About a week ago I left my country and my work place and moved to a new place to start another chapter of my life. Now I'm a graduate student at Kyungpook National University (KNU) in Daegu city, South Korea. I will be staying here several years until I complete my masters and doctoral studies.

I arrived in the beginning of the Spring season and therefore it's still cold everywhere. There are some Sri Lankan students who are studying here including a past student of University of Colombo School of Computing (UCSC). Their existence made my life easier since they knew all the necessary things  to survive here before I arrive.

I'm staying in a dormitory of KNU and therefore it's much easier to carry on my work. Dormitory has all the facilities and it's very comfortable. The three meals for a day is provided by the dormitory cafeteria. I'm working with Professor Dongkyun Kim and he is my academic adviser. He is leading the Wireless & Mobile Internet Laboratory (MoNet) in the department of computer science and engineering where I'm involved with his research work. The other members of the MoNet lab includes some graduate students from Korea and also Pakistan. All of them are so friendly to me.

By any mean KNU is a beautiful university. It is so huge and has almost all the components of a university such as medical, engineering, humanities, etc. Still I got only few chances to go around the university. There are so many things to explore. Until this article all the previous articles I've written are don while staying in Sri Lanka. But from now on I will be writing about various things from here in my new place.  

Tuesday, February 5, 2013

My Love Over A Noisy Channel


    I'll tell you the story first.

    There's a beautiful valley in between two mountains. An armed force called Red army have settled their camp in this valley. They have a man power of 700 soldiers. There's another armed force called White army which resides in the mountains. One part of the White army resides in one mountain having 500 soldiers while the other part of the White army resides in the other mountain also having 500 soldiers. Therefore altogether White army has 1000 man power. Let's call the two mountains as mount-1 and mount-2.

    Now here's the rules of this world. In any battle the victory is on the hand of the party who have highest man power on the battle field. The loser's whole man power in the battle field gets wiped out while the winner's soldiers don't get any casualty. Therefore the victory in a war is just a matter of having more man power in the field than the enemy in this imagined world. Additionally in this world there's no any distance communication like wireless communication, birds who bring letters, smoke messages, etc.

    OK, back to the battle field. Now the commander who is in-charge of mount-1 of the White army want to destroy the whole Red army who have occupied the valley. But he has only 500 soldiers which is not enough to face the 700 soldiers in Red army. However there's another battalion of the White army in mount-2 with 500 more soldiers. So, the obvious solution is to ask for help from the other White army battalion. If both White forces attack at the same time, according to the rules whole Red army will get wiped out and the White army wins.

    The commander in the mount-1 is really happy about his brilliant idea. Now he should pass his battle plan to the mount-2 commander since they both have to attack the Red army at the same time. Suppose the battle plan message says "Let's attack Red army on next Friday morning at 5.34am". The commander of mount-1 chose a soldier and gave him the message and ordered to go to mount-2 to give the message to that commander. There's only one way to get to mount-2 from mount-1. The poor soldier goes through the enemy lines putting his life in danger. What a brave man. If he gets captured by the Red army definitely they will kill him.

    OK, so now we have some theoretical questions. On next Friday at 5.34am can mount-1 commander launch his attack ? How does he know that the soldier he sent has successfully delivered the message ? If the message hasn't delivered, the complete White army battalion in the mount-1 is going to be wiped out by the Red army. Now suppose the message is actually delivered by that brave man to the mount-2 commander. So, on next Friday at 5.34am can mount-2 commander launch his attack ? How does he make sure that mount-1 commander will do it as mentioned in the battle plan since he still doesn't know whether mount-2 commander got the message ? This is a risky situation.

    So, mount-2 commander writes an acknowledgement massage saying that "OK, my battalion too will attack on next Friday morning at 5.34am". Now again a solder is sent from mount-2 to mount-1 in the same routine with the acknowledgement message. Okay, then next Friday at 5.34am can mount-2 commander launch his attack ? How does he know whether his acknowledgement message has reached the mount-1 commander ? If the soldier with the acknowledgement message has got killed on the enemy line, the mount-2 force might get wiped out if they attack alone in next Friday. So, now what should happen ? The mount-1 commander has to acknowledge the acknowledgement message. When will this message loop end ?

    I heard this story two times from a very impressive lecturer I've met in my undergraduate university life. He's Dr. Chamath Keppitiyagama. For the first time he mentioned the story at the 'Operating Systems' lecture back in my second year. Then again he mentioned the story in my fourth year during 'Communication Networks' lecture.

    This story about the two armies is a very good way to explain the situation of sending data over noisy communication mediums like copper cables, radio signals and even fibre optics. The data we are sending might get lost or get altered while they are travelling through such mediums. Therefore it's a huge challenge to make sure that whatever the data we're sending has arrived the destination safely.

    Coding Theory is the field in Computer Science which deals with this challenge. We use various error detecting and error correcting codes to make sure what we have received from a sender over a noisy channel is exactly what he or she has sent from that side. When the Internet data traffic goes through the complex networking infrastructures, it's absolutely necessary to detect and correct possible errors that occur. Otherwise the communication networks we're using today for our everyday purposes may not become usable at all.

    Anyway we have to face the reality. All the kinds of error detecting and correcting codes we are using today in Coding Theory can only reduce the probability of errors to some extent but they can not reduce error probability to zero. That means having all these sophisticated mechanisms, we are still exposed to the risk of data loss and data alteration during communication. This is all due to the availability of noise in our communication mediums. When we are using networked communication, errors can occur any time if noise is there.

    Due to these reasons, if you send an SMS or email to someone saying "I love you!" there's a probability for it to reach your partner's computing device as "I hate you!!". Of course the probability is very smaller. Remember the probability for a tsunami to occur in Indian ocean which can affect Sri Lanka was mathematically ignorable. But it happened.


Tuesday, January 22, 2013

Converting OGV files to AVI on Linux

Recently when I was presenting a research work I wanted to show a video on how to do it practically. For this purpose I used Record My Desktop tool. However the video output from this tool were in OGV file format which is not that commonly used outside Linux environments. Therefore I wanted to convert these video files in OGV format to some commonly used video file format.

After searching on the web I found that the command line tool mencoder can be used to convert between different video file formats. It seems this tool comes as a support program for the video player called MPlayer. Therefore when we do "man mencoder" in the terminal, the manual pages gives details about both Mencoder tool and MPlayer.


For example consider we have file called my_video.ogv and we need to convert it to the AVI format so that the resulting file should be my_video.avi. We do the conversion by issuing the following command with the given parameters.

mencoder my_video.ogv -o my_video.avi -oac mp3lame -lameopts fast:preset=standard -ovc lavc -lavcopts vcodec=mpeg4:vbitrate=4000

I have no clear understanding on what each parameter represent in the command. However this is the way I found it in the web somewhere.