Wednesday, March 30, 2016

Programming RedBearLab's BLE Nano using Arduino IDE

I received an opportunity to put my hands on a Bluetooth Low Energy (BLE) chip. The exact setup was a BLE Nano V1.5 module with a MK20 USB V1.0 programmer module (link: http://redbearlab.com/blenano/). With this setup, we can program it an try some sample applications. Since the modules are shipped with the header pins unsoldered, we have to first solder the header pins properly. Then we get the setup as can be seen from the figure shown. There we have the BLE Nano module and the MK20 programmer module plugged in together and connected to the computer using a USB cable.

Following are the steps I followed to program the module using an Arduino IDE. The exact Arduino version I had was 1.6.5 on Ubuntu Linux 14.04.

(1) First of all, we need to put some bootloader hex file into the board in order to make it programmable using Arduino IDE. For this purpose, plug-in the setup to the USB port so that you can access the flash storage of the board which comes up with the name MBED. Download the bootloader.hex file from this link and copy it into this MBED directory.

(2) Open the Arduino IDE and goto the Preferences from the File menu. In the field where you have to enter Additional Boards Manager URLs, add the following line.

https://redbearlab.github.io/arduino/package_redbearlab_index.json

Then click OK on the correct places and get back.

(3) Now go to the menu Tools->Board:->Boards Manager... and there you get a window with a text field as a search bar. Search for the RedBearLabs nRF51822 Boards library and install it.

(4) Now, from the Tools menu again, select the correct board "BLE Nano (v1.5 32KB)".

(5) Plug in the BLE Nano module with the programmer board to the USB port and check the name of the device as it was mounted to /dev. In my case, it was detected as /dev/ttyACM0. So, provide permission for the device as follows from the terminal.

sudo chmod 777 /dev/ttyACM0

(6) Time to run a sample program. Open the blink program from the Examples menu and upload it to the board. We should be able to see the LED on the BLE Nano board blinking.

There are many other examples provided related to BLE which I'm hoping to try later.

References:

[1] https://www.youtube.com/watch?v=d75strWav5k&feature=youtu.be
[2] https://github.com/RedBearLab/nRF51822-Arduino

Wednesday, March 16, 2016

Paging Architecture in xv6 Operating System

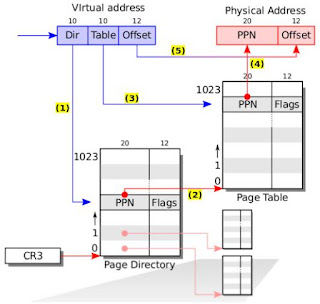
xv6 paging architecture
It is interesting to learn about how xv6 operating system manages it's memory address space using virtual and physical addresses. Since it is a little bit complicated functionality, I decided to write a little note on how paging is used in xv6 to manage memory. There is a separate chapter called Page Tables in the xv6 book provided by MIT. At the moment I write this, the latest version of this book is revision 8. That chapter in the book clearly describe the paging functionality with an illustration in Figure 2-1. To make my own description clear, I'm using an edited version of that figure in this blog post. In that figure, I have added a number sequence with the yellow color closer to the arrows as an index for my description which comes shortly.

As we already know, each process running inside xv6 has an address space where every reference to a memory location is done using a virtual memory address. That means, there are no memory locations with such addresses in the physical memory. What happens is that the operating system with the help of a hardware component called MMU (memory management unit), is mapping those virtual memory addresses with real memory address in the physical memory. Such a functionality is achieved by breaking the physical memory into segments which we call Pages. Each process running inside xv6 has an address space which is mapped to pages in physical memory address space via MMU. Whenever a running process refers to a virtual memory address, the processor should go through a sequence of actions to find the real physical memory location which represent that virtual memory address.

Here's how this is organized. The xv6 has set up virtual to physical memory address resolution in two stages. First of all, there's something called Page directory. There's only one page directory in xv6 with 1024 entries (rows). Each entry in the page directory contains the index number of a page table. That means, there are 1024 page tables in xv6. The above figure illustrates this situation. It is important to know the composition of a virtual memory address. A virtual memory address has a length of 32 bits and and it can be considered as three components. Those are namely, a 10 bit long component called Dir, another 10 bit component called Table and finally a 12 bit long component called Offset. When such a virtual memory address is present, following list explains how it is converted to the physical address. Note that the number in the below list corresponds to the yellow colored arrow indexes in the above figure.

(1) The 10 bit long Dir part of the virtual address can have a value starting from 0 to 2^10 (ie-1024). This value points to the specific entry in the 1024 entries long page directory.

(2) The value contained in that specific page directory entry has a number which is the index number of a specific page table. That means we can find the correct page table using that value in the page table entry. It is also evident that, we can have up to 1024 unique page tables since there are 1024 entries in the page directory.

(3) After finding the correct page table, we have to look at the second part of the virtual address to proceed. This second part of the virtual address called Table has a 10 bit long value and that means it can represent a value from 0 to 2^10 (1024). This value points to a specific entry in the selected page table. Inside this page table entry, we can find a 20 bit long value called PPN (physical page number). Moreover, it hints us that a page table has 1024 entries.

(4) The value contained in the selected page table entry called PPN is what we want. This value is the first 20 bits of the physical address.

(5) Now we have found the first 20 bits of the physical memory address which should have 32 bits. That means we need to find 12 more bits of the physical address. But actually, the Offset segment which had a 12 bit value in the virtual address is exactly the same value which is in the last 12 bits of the physical address. So, we can directly take that value.

That's how the system converts a given virtual memory address to a physical memory address. Page directory and page tables are stored in the physical memory and the processor automatically converts from virtual to physical addresses using these data structures and with the help of MMU hardware.

Monday, March 7, 2016

A New System Call to xv6

In our explorations with xv6 operating system, adding a new system call is one of the most important activities that helps us to learn the internal working of the system call handling functionality of the operating system. In this blog post, I'm going to implement a system call called getyear which will return 1975 from the kernel always. the Unix version 6 was released in that year. Even though this system call does not do any useful thing, it shows us the necessary places in the source code of xv6 which we have to touch in this kind of business.

We start this work from syscall.h file where a number is assigned to every system call in this xv6 system. As you can see, there are 21 system calls already defined in this file. Let's go ahead and add the following line to reserver a system call number for our own system call.

#define SYS_getyear  22

Now we have to do some additional work in syscall.c file related to the line we added in the header file above. So, open the C file. There's an array of function pointers inside this file with the function prototype static int (*syscalls[])(void). It uses the numbers of system calls defined above as indexes for a pointer to each system call function defined elsewhere. At the end of this function pointer array, let's add the following line.

[SYS_getyear]   sys_getyear,

This means, when a system call occurred with the system call number 22, the function pointed by the function pointer sys_getyear will be called. So, we have to implement this function. However, this file is not the place we are going to implement it. We will just put the function prototype here inside this file. So, find the suitable place inside this file and add the following line. You can see that all the other 21 system call functions are defined similarly.

extern int sys_getyear(void);

Now, let's implement this actual system call function. There are two files inside xv6 system where system calls are defined. sysproc.c and sysfile.c are those two places. If you open and check, you will see that many system calls related to file system are located in sysfile.c while the rest is in sysproc.c. So, to implement our system call, we use the file sysproc.c. Open it and add the following function implementation at the end of the file.


1
2
3
4
5
6
// return the year of which the Unix version 6 was released
int
sys_getyear(void)
{
    return 1975;
}


Now we have just two little files to edit and these files will contain the interface for our user program to access the system call. Open the file called usys.S and add a line line the below at the end.

SYSCALL(getyear)

Then, open the file called user.h and add the following line. This is the function that the user program will be calling. As you know now, there's no such a function implemented in the system. Instead, a call to the below function from a user program will be simply mapped to the system call number 22 which is defined as SYS_getyear preprocessor directive. The system knows what exactly is this system call and how to handle it.

int getyear(void);

Having done all the above stuff, our xv6 operating system now contains a new system call. Let's write a user program which will try to make that new system call to see whether the xv6 kernel respond to it. I have previously written about how to add a user program to xv6. Refer this blog post to achieve it. Following those steps, add a user program but the content of the program should be as follows.


 1
 2
 3
 4
 5
 6
 7
 8
 9
10
11
12
13
// #Asanka:
// A simple program which just print something on screen

#include "types.h"
#include "stat.h"
#include "user.h"

int
main(void)
{
 printf(1, "Unix V6 was released in the year %d\n", getyear());
 exit();
}


After adding this user program properly into the xv6 source code directly and making the necessary changes in Makefile, we can attempt to compile and run it. So, issue the following commands inside the source code directory of xv6.

make clean
make

Now, start the xv6 system on QEMU and wait till it boots up to the shell prompt. There you can issue ls command to see whether your user program is available. If yes, just go ahead and run the program. It should give you an output like the one shown in the above picture if everything went smoothly.

References:

[1] http://www.fotiskoutoulakis.com/2014/04/28/introduction-to-xv6-adding-a-new-system-call.html

[2] http://moss.cs.iit.edu/cs450/assign01-xv6-syscall.html

Adding a User Program to xv6

It is pretty much simple and straightforward to write a user level C program for xv6 and making it available for the user at the shell prompt. When we go forward and implement much advanced things on the xv6 OS, most of the times we need to test those features by using a user level program. Therefore, knowing how to write such programs and adding it into the xv6 source code for compilation is a necessary thing. Therefore, I decided to write down those simple steps even though it is very simple.

First of all, let's create a C program like the following. We save it inside the source code directory of xv6 operating system with the name asankas_program.c or whatever the name you prefer.


 1
 2
 3
 4
 5
 6
 7
 8
 9
10
11
12
// A simple program which just prints something on screen

#include "types.h"
#include "stat.h"
#include "user.h"

int
main(void)
{
 printf(1, "Asanka's first user program on xv6\n");
 exit();
}


Now, we have to edit the Makefile of the xv6 source code in order to let the compiler know that we have a program like this and we need it to be compiled with other system programs. In the Makefile, there are two places in which we need to put entries.

Find the place with some lines like the following. We have to add a line as shown below to notify about our new program.

UPROGS=\
    _cat\
    _echo\
    _forktest\
    _grep\
    _init\
    _kill\
    _ln\
    _ls\
    _mkdir\
    _rm\
    _sh\
    _stressfs\
    _usertests\
    _wc\
    _zombie\
    _asankas_program\


Similarly, find the place with the lines like below. Add an entry as shown to indicate that we have a program called asankas_program.c there.

EXTRA=\
    mkfs.c ulib.c user.h cat.c echo.c forktest.c grep.c kill.c\
    ln.c ls.c mkdir.c rm.c stressfs.c usertests.c wc.c zombie.c\
    asankas_program.c\
    printf.c umalloc.c\
    README dot-bochsrc *.pl toc.* runoff runoff1 runoff.list\
    .gdbinit.tmpl gdbutil\


Now, our Makefile and our user program is ready to be tested. Enter the following commands to compile the whole system.

make clean
make


Now, start xv6 system on QEMU and when it booted up, run ls command to check whether our program is available for the user. If yes, give the name of that executable program, which is in my case is asankas_program to see the program output on the terminal. The figure above shows this output on the QEMU emulator window.

More Explorations With GDB on xv6 Operating System

In a previous post, I wrote about the basic usage of GDB with xv6 operating system to inspect its internal functionalities such as function calls. First of all, we should make some fix in the code of Makefile before proceeding since in the version I have, GDB is not giving me the output I wanted sometimes.

Starting the system:

(1) Move into the source file of the xv6 operating system and open the Makefile. At around line number 76, there will be a content like this which you should comment and all the other line instead.

#CFLAGS = -fno-pic -static -fno-builtin -fno-strict-aliasing -Wall -MD -ggdb -m32 -Werror -fno-omit-frame-pointer
CFLAGS = -fno-pic -static -fno-builtin -fno-strict-aliasing -Wall -MD -ggdb -m32 -Werror -fno-omit-frame-pointer -gdwarf-2

 
(2) Now, we are ready to explore xv6 futher using GDB. As described in the previous post, let's start xv6 on QEMU using a one terminal and in a separate terminal we should start GDB.

On terminal prompt 1:
cd ~/Downloads/my-xv6/xv6-master/
make qemu-gdb


On terminal prompt 2:
cd ~/Downloads/my-xv6/xv6-master/
gdb kernel


Exploring internal function calls:

At this point, the QEMU emulator should be started but the xv6 operating system is not booted yet. It is waiting for our commands on the (gdb) prompt. Let's assign a breakpoint at exec function call and then explore the whole thing.

Give the following commands on (gdb) prompt to assign a breakpoint as exec function and then to continue the execution of the xv6 OS.

(gdb) b exec
(gdb) c


Then the xv6 should start booting and then it will stop at the point where the exec function is called by the system. It will look like the following.

(gdb) c
Continuing.
[New Thread 2]
[Switching to Thread 2]
The target architecture is assumed to be i386
=> 0x80100aef <exec>:    push   %ebp

Breakpoint 1, exec (path=0x1c "/init", argv=0x8dfffe98) at exec.c:12
12    {
(gdb)


It is clear that the exec function was called to execute the init program which is the very first user process to run on xv6 operating system. We can view the parameters passed to this instance of exec function by giving commands as below.

(gdb) p argv[0]
$1 = 0x1c "/init"
(gdb) p argv[1]
$2 = 0x0
(gdb) p argv[2]
$3 = 0x0


Additionally, we have the capability to explore the sequence of functions called inside the system to reach this exec function call. For that, we can use the bt command which means the backtrace of function calls.

(gdb) bt
#0  exec (path=0x1c "/init", argv=0x8dfffe98) at exec.c:12
#1  0x80105d94 in sys_exec () at sysfile.c:400
#2  0x80105106 in syscall () at syscall.c:133
#3  0x801062a4 in trap (tf=0x8dffffb4) at trap.c:43
#4  0x80106095 in alltraps () at trapasm.S:23


Let's continue and see when it calls the exec system call again.

(gdb) c
Continuing.
=> 0x80100aef <exec>:    push   %ebp

Breakpoint 1, exec (path=0x8c3 "sh", argv=0x8dffee98) at exec.c:12
12    {
(gdb) bt
#0  exec (path=0x8c3 "sh", argv=0x8dffee98) at exec.c:12
#1  0x80105d94 in sys_exec () at sysfile.c:400
#2  0x80105106 in syscall () at syscall.c:133
#3  0x801062a4 in trap (tf=0x8dffefb4) at trap.c:43
#4  0x80106095 in alltraps () at trapasm.S:23
#5  0x8dffefb4 in ?? ()
Backtrace stopped: previous frame inner to this frame (corrupt stack?)


It is obvious what happened there. The very first user process init called exec again to create the shell process called sh. That's how we get the shell prompt in the xv6 system. If we type c to continue, the shell will wait for a command from us. Let's run ls command on the shell prompt and see what GDB brings to us.

(gdb) c
Continuing.
=> 0x80100aef <exec>:    push   %ebp

Breakpoint 1, exec (path=0x1a60 "ls", argv=0x8dfbee98) at exec.c:12
12    {


Here we go. The shell process executed the exec function again to start the process running ls program is shown above. In this way, we can explore internal functionality and the sequence of function calls of xv6 operating system using GDB easily.

References:

[1] http://zoo.cs.yale.edu/classes/cs422/2013/lec/l2-hw

[2] http://staff.ustc.edu.cn/~bjhua/courses/ats/2014/hw/hw-interface.html

Wednesday, March 2, 2016

Running xv6 in QEMU with GDB

In a previous post, I wrote about how to setup and run xv6 operating system on a QEMU platform. However, when making changes and doing advanced stuff with xv6 operating system, it is highly necessary to have debugging option to see how things work behind the seen. Let's run xv6 with debugging mode enabled.

(1) First of all, I should configure my GDB. Since the source code of xv6 is located in /home/asanka/Downloads/my-xv6/xv6-master of my computer, I have to do the following. First I should move into my home directory and create a text file as follows

nano .gdbinit

Then add the following line inside it.

add-auto-load-safe-path /home/asanka/Downloads/my-xv6/xv6-master/.gdbinit

Now save the file and exit from nano editor.

(2) It's time to start and run our xv6 system. Open a terminal and goto xv6 directory and start it.

make qemu-gdb


It will start QEMU but will stop in the middle with a black screen. Now, open a new
terminal tab inside the same source code directory of xv6 and run the command

gdb

It will bring us to the (gdb) prompt. We can add some break points here as follows.

break main.c:main
break trap
break alltraps


Finally we are ready to continue the program execution of xv6. For that, type
following command on (gdb) prompt.

continue

or you can simply type,

c

Now, the OS will start booting in the QEMU window but will stop at the breakpoints to give us some information at the (gdb) prompt. In each time it stops at a breakpoint, we can use above continue or c command to move to the next breakpoint. Finallly, when we want to quit, we can close QEMU window to stop xv6 OS and then in the terminal where the (gdb) prompt is running, type quit in order to exit from the debugging session.

References: