Tuesday, February 23, 2016

Emulating Networks with Routers using Mininet

Basic setup and the simple usages of Mininet emulator is described in two previous blog posts which are given in the references section of this article. In this blog post, I'm hoping to write more examples coving the usage of Linux routers on a Mininet emulation. Since having multiple IP domains within the emulation makes it complicated to explain each interface, I decided to use some diagrams. Let's start.


Simple network with a router and two hosts

The above diagram shows our first network. We have a router and two hosts connected to it directly. IP addresses assigned to each interface is clearly defined there. Let's implement that network using a python script as follows.

 1
 2
 3
 4
 5
 6
 7
 8
 9
10
11
12
13
14
15
16
17
18
19
20
21
22
23
24
25
26
27
28
29
30
31
32
33
34
35
36
37
38
39
40
41
42
43
44
45
46
47
48
49
#!/usr/bin/python

from mininet.topo import Topo
from mininet.net import Mininet
from mininet.node import Node
from mininet.log import setLogLevel, info
from mininet.cli import CLI

class LinuxRouter( Node ):
    "A Node with IP forwarding enabled."

    def config( self, **params ):
        super( LinuxRouter, self).config( **params )
        # Enable forwarding on the router
        self.cmd( 'sysctl net.ipv4.ip_forward=1' )

    def terminate( self ):
        self.cmd( 'sysctl net.ipv4.ip_forward=0' )
        super( LinuxRouter, self ).terminate()


class NetworkTopo( Topo ):
    "A LinuxRouter connecting three IP subnets"

    def build( self, **_opts ):

        defaultIP = '10.0.1.1/24'  # IP address for r0-eth1
        router = self.addNode( 'r0', cls=LinuxRouter, ip=defaultIP )

        h1 = self.addHost( 'h1', ip='10.0.1.2/24', defaultRoute='via 10.0.1.1' )
        h2 = self.addHost( 'h2', ip='10.0.2.2/24', defaultRoute='via 10.0.2.1' )

        self.addLink( h1, router, intfName2='r0-eth1', params2={ 'ip' : '10.0.1.1/24' } )
        self.addLink( h2, router, intfName2='r0-eth2', params2={ 'ip' : '10.0.2.1/24' } )


def run():
    "Test linux router"
    topo = NetworkTopo()
    net = Mininet( topo=topo )  # controller is used by s1-s3
    net.start()
    info( '*** Routing Table on Router:\n' )
    print net[ 'r0' ].cmd( 'route' )
    CLI( net )
    net.stop()

if __name__ == '__main__':
    setLogLevel( 'info' )
    run()

When we run the above script we get the Mininet CLI interface where we can start the xterm terminals for the hosts h1 and h2. Using the two terminals on the two hosts, we can do different things such as pinging from one to the other, using traceroute command and even wireshark to capture the packets going between the two hosts. Following figure shows  the two xterm terminals on my machine.

xterm terminals of two hosts between a router
Let's build a little bit complicated network than the above simple network. This time we are going to use three hosts and only one is directly connected to the router. The other two are connected to a switch, which connects to the router. Following figure illustrate that network.

A network with a router, switch and three hosts.

Implementation of that network is given below. I hope that when reading through the code, it is easily to understand how the above illustrated network has became a reality in our emulation code.

 1
 2
 3
 4
 5
 6
 7
 8
 9
10
11
12
13
14
15
16
17
18
19
20
21
22
23
24
25
26
27
28
29
30
31
32
33
34
35
36
37
38
39
40
41
42
43
44
45
46
47
48
49
50
51
52
53
54
#!/usr/bin/python

from mininet.topo import Topo
from mininet.net import Mininet
from mininet.node import Node
from mininet.log import setLogLevel, info
from mininet.cli import CLI

class LinuxRouter( Node ):
    "A Node with IP forwarding enabled."

    def config( self, **params ):
        super( LinuxRouter, self).config( **params )
        # Enable forwarding on the router
        self.cmd( 'sysctl net.ipv4.ip_forward=1' )

    def terminate( self ):
        self.cmd( 'sysctl net.ipv4.ip_forward=0' )
        super( LinuxRouter, self ).terminate()


class NetworkTopo( Topo ):
    "A LinuxRouter connecting three IP subnets"

    def build( self, **_opts ):

        defaultIP = '10.0.1.1/24'  # IP address for r0-eth1
        router = self.addNode( 'r0', cls=LinuxRouter, ip=defaultIP )

        h1 = self.addHost( 'h1', ip='10.0.1.2/24', defaultRoute='via 10.0.1.1' )
        h2 = self.addHost( 'h2', ip='10.0.2.2/24', defaultRoute='via 10.0.2.1' )
        h3 = self.addHost( 'h3', ip='10.0.2.3/24', defaultRoute='via 10.0.2.1' )

 s1 = self.addSwitch('s1')

        self.addLink( h1, router, intfName2='r0-eth1', params2={ 'ip' : '10.0.1.1/24' } )
        self.addLink( s1, router, intfName2='r0-eth2', params2={ 'ip' : '10.0.2.1/24' } )

 self.addLink(h2, s1)
 self.addLink(h3, s1)

def run():
    "Test linux router"
    topo = NetworkTopo()
    net = Mininet( topo=topo )  # controller is used by s1-s3
    net.start()
    info( '*** Routing Table on Router:\n' )
    print net[ 'r0' ].cmd( 'route' )
    CLI( net )
    net.stop()

if __name__ == '__main__':
    setLogLevel( 'info' )
    run()

After running the python script, I open the xterm terminals of the three hosts and and then pinged from host 1 to host 3. Additionally, I ran traceroute command on host 1 to find the route to host 3. Those outputs can be seen from the following image.

xterm terminals of three hosts connected by a router and a switch.
With these examples, I think it's getting clear how to build and emulate networks using Mininet.

References:


Emulating Simple Networks with Mininet

In a previous blog post, I wrote about how to set up the environment for using Mininet simulator. Now, it's time to try some simple networks with it. It is important to note that in these emulations, we use python scripts to specify our network components and their connectivity. Then when we run the script, the network gets emulated on our Linux machine.  For this purpose, first of all we should start the Mininet VM and then log in to it remotely from our host Linux machine via SSH with X11 forwarding. How to do this is described in that previous blog post.

Let's start with a simple situation. We are going to define a switch and two hosts, which connects to that switch. Following code segment defines this setup and ping from each host to the other host.


 1
 2
 3
 4
 5
 6
 7
 8
 9
10
11
12
13
14
15
16
17
18
19
20
21
22
23
24
25
26
27
28
29
30
31
#!/usr/bin/python

from mininet.topo import Topo
from mininet.net import Mininet
from mininet.util import dumpNodeConnections
from mininet.log import setLogLevel

class SingleSwitchTopo(Topo):
 "Single switch connected to 2 hosts."
 def build(self, n=2):
  switch = self.addSwitch('s1')
  host = self.addHost('h1')
  self.addLink(host, switch)
  host = self.addHost('h2')
  self.addLink(host, switch)

def simpleTest():
 "Create and test a simple network"
 topo = SingleSwitchTopo(n=4)
 net = Mininet(topo)
 net.start()
 print "Dumping host connections"
 dumpNodeConnections(net.hosts)
 print "Testing network connectivity"
 net.pingAll()
 net.stop()

if __name__ == '__main__':
 # Tell mininet to print useful information
 setLogLevel('info')
 simpleTest()

Save the above python script as test-network.py and run it as follows.

sudo python test-network.py

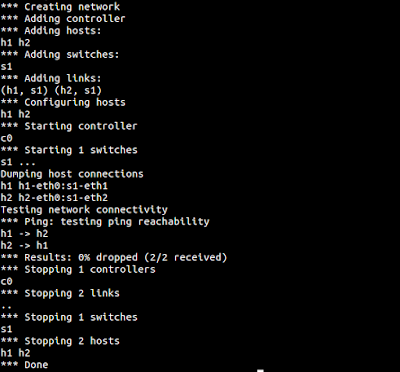
The output of this script is shown below.

Output of simple network
Now, it's time to improve the above script with a little more functionality. We can run a command on each host and display the output of them. Look at the following code which shows those changes to our python script.


 1
 2
 3
 4
 5
 6
 7
 8
 9
10
11
12
13
14
15
16
17
18
19
20
21
22
23
24
25
26
27
28
29
30
31
32
33
34
35
36
37
38
39
40
41
42
#!/usr/bin/python

from mininet.topo import Topo
from mininet.net import Mininet
from mininet.util import dumpNodeConnections
from mininet.log import setLogLevel

class SingleSwitchTopo(Topo):
 "Single switch connected to 2 hosts."
 def build(self, n=2):
  switch = self.addSwitch('s1')
  host = self.addHost('h1')
  self.addLink(host, switch)
  host = self.addHost('h2')
  self.addLink(host, switch)

def simpleTest():
 "Create and test a simple network"
 topo = SingleSwitchTopo(n=4)
 net = Mininet(topo)
 net.start()
 print "Dumping host connections"
 dumpNodeConnections(net.hosts)
 print "Testing network connectivity"
 net.pingAll()
 
 print "Running ifconfig on the host h1"
 h1 = net.get('h1')
 result = h1.cmd('ifconfig')
 print result

 print "Running ifconfig on the host h2"
 h2 = net.get('h2')
 result = h2.cmd('ifconfig')
 print result

 net.stop()

if __name__ == '__main__':
 # Tell mininet to print useful information
 setLogLevel('info')
 simpleTest()

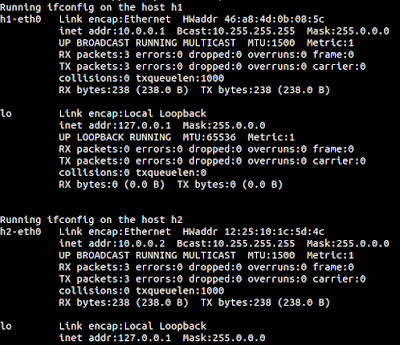
Now, running the script with above changes results in an output like the following. Please note that since the output is lengthy now, I'm just showing the place of the output which differs from the previous one. Which means the output of the 'ifconfig' commands on each host.

Output of 'ifconfig' command on each host
In addition to directly running commands on each host using the .cmd() function, there's another nice way of interacting with the hosts. For that, we have to take the command line interface of Mininet emulator. It is just a matter of adding a little line. Look at the following python script which simply do that.


 1
 2
 3
 4
 5
 6
 7
 8
 9
10
11
12
13
14
15
16
17
18
19
20
21
22
23
24
25
26
27
28
29
#!/usr/bin/python

from mininet.topo import Topo
from mininet.net import Mininet
from mininet.util import dumpNodeConnections
from mininet.log import setLogLevel
from mininet.cli import CLI

class SingleSwitchTopo(Topo):
 "Single switch connected to 2 hosts."
 def build(self, n=2):
  switch = self.addSwitch('s1')
  host = self.addHost('h1')
  self.addLink(host, switch)
  host = self.addHost('h2')
  self.addLink(host, switch)

def simpleTest():
 "Create and test a simple network"
 topo = SingleSwitchTopo(n=4)
 net = Mininet(topo)
 net.start()
 CLI(net)
 net.stop()

if __name__ == '__main__':
 # Tell mininet to print useful information
 setLogLevel('info')
 simpleTest()

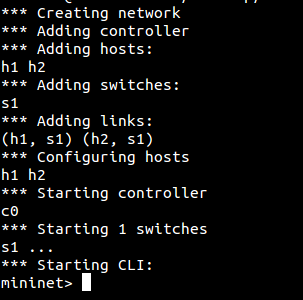
Running the above script results in a much different output than what we received so far. Here, we receive a command prompt from Mininet as follows. We can type various commands on this prompt and get various things done.

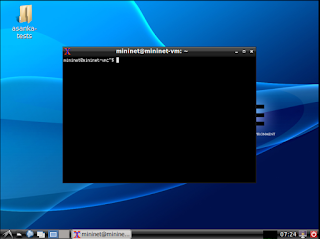
Mininet CLI
We can run the xterm terminals on the two hosts h1 and h2 of this network using this CLI interface. For that type the following line on the prompt and press Enter.

xterm h1 h2

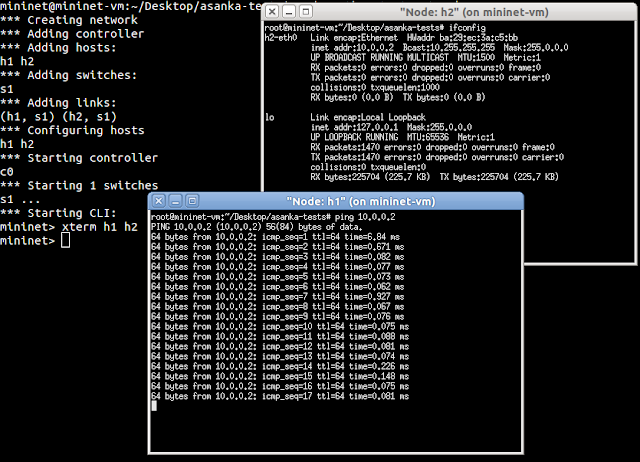
By running that command, we now get two new windows with xterm terminals where each terminal belows to a host. Using these terminals, we can run different commands on each host. For example in the following figure, I have typed 'ifconfig' on one xterm to find the IP address of that host and then ping to it from the other host using its xterm terminal.

Ping from one host to the other through xterm


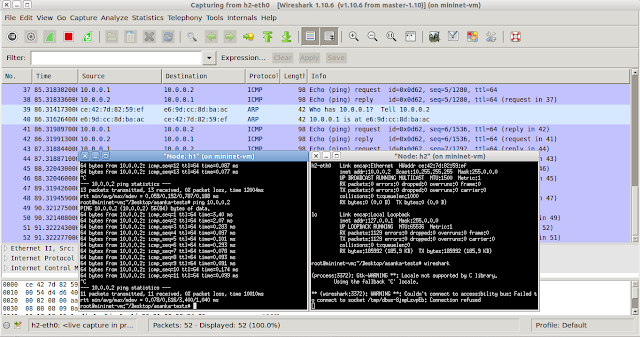
Similarly we can do many more things. Using the xterm of host 2, we can start Wireshark network protocol analyzer and then when we ping from the host 1, wireshark running on host 2 will display the packets. Following figure shows this scenario.
Ping from host 1 to host 2 while running wireshark on host 2.
That's all for now with a single switch and two hosts. Let's look at different other networking topologies in another blog post.

Monday, February 22, 2016

Setting up Mininet Network Emulator

Mininet VM with LXDE desktop
When learning computer networking related courses, it is necessary to get a hands on experience on the building networks based on the theories we learn. However, due to various limitations, it is not easy to use real hardware to build real networks. Simulating and emulating networks is the choice we have under such circumstances. Having said that, using network simulators/emulators is also not an easy job due to complexities in most of such software tools available out there. Therefore, it is important to find an easy to use and yet feature rich network simulator/emulator.

Mininet is a network emulator developed by some researchers in Stanford University and it is being used by different other universities in their networking courses. In this blog post, I'm writing down the initial steps of preparing the environment to use Mininet simulator on my computer. So, here we go.

(1) Download mininet vm image from here (I downloaded the 32-bit version).
https://github.com/mininet/mininet/wiki/Mininet-VM-Images

(2) Extract the zipped file and inside it, we have .ovf file which can be imported
to a virtualization software. I used VMWare Workstation Player to import
this VM.

(3) Now, start the VM. It starts with text-only screen because there's no X11 sever. We can login to the VM using user name mininet and password again mininet.

(4) It is possible to use this tool without any GUI since we can login to the VM using ssh from our host OS and do all the network emulation stuff.

However, in case somebody want to directly perform network emulations on this VM using it's GUI interface, we should install a graphical desktop environment. Use the following commands for that.

sudo apt-get update
sudo apt-get install xinit lxde

(5) Now the vm is ready to be used. There are two ways to move forward from this point. We can either type startx on the prompt and goto the GUI to do our network emulation jobs or we can open a terminal from our guest OS and ssh to the VM as follows.

ssh -X mininet@192.168.109.129

To find the IP address of the mininet VM, first of all we have to type 'ifconfig' on the command line of the Mininet VM. The above IP address is what I found out in that way.
Login to Mininet VM from host OS with SSH

I'm hoping to write few separate blog posts about using this Mininet emulator setup to implement and try different simple networks.

References:

[1] https://github.com/mininet/mininet

[2] https://github.com/mininet/mininet/wiki/Introduction-to-Mininet

Sunday, February 21, 2016

Installing and Running xv6 Operating System

xv6 running on QEMU
When learning advanced concepts of operating systems, it is interesting to look at the source code of a real operating system. However unfortunately, most of the open source operating system source codes are so huge and it is not an easy job to read the code and understand how certain things are implemented. In a situation like that, it is important to have something much smaller in size while providing all the necessary ingredients of a real operating system.

xv6 is an operating system developed by MIT for the exact same purpose. It is an implementation of the Unix version 6 using ANSI C language for x86 platforms. It is a great resource for learning operating systems and many universities all over the world have already used it in their courses. Here's how we run xv6 operating system on a QEMU virtual machine simply on top of a 64-bit Ubuntu 14.04 LTS machine.

First of all, we have to install some tools and packages on our Ubuntu Linux system as follows.

sudo apt-get update
sudo apt-get install build-essential
sudo apt-get install gcc-multilib
sudo apt-get install qemu
sudo apt-get install git

Now, let's download the source code of the xv6 operating system. MIT provided an official git repository to download the source code. However, I have cloned it into a my own repository on Github from where I will get it.

git clone https://github.com/asanka-code/xv6.git
cd xv6

After moving into the directory with the source code, we need to make an important entry inside the Makefile. Therefore, find the line which has the QEMU command and update it to make it look like as follows.

QEMU = qemu-system-x86_64

Time to compile and run xv6 system on QEMU emulator.

make
make qemu

This will startup a window with QEMU emulator and will start the shell prompt of xv6 operating system.

References:

[1] Frans Kaashoek. 6.828 Operating System Engineering, Fall 2012. (Massachusetts Institute of Technology: MIT OpenCourseWare), http://ocw.mit.edu (Accessed 22 Feb, 2016). License: Creative Commons BY-NC-SA

[2] http://janfan.github.io/english-blog/english/2014/06/17/how-i-learn-os.html