When comes to personal health care device systems, a major problem which can occur is the incompatibility between different devices manufactured by different vendors. The obvious solution is the standardization. So, IEEE has defined the IEEE 11073 protocol for personal health device communication. Antidote is an open source library which implements this protocol for using in such personal health device systems. Recently I got a chance to try this implementation and find out how it works. As usual, for the sake of not forgetting the steps I followed, I'm writing down everything here.
To test Antidote with the sample Agent and Manager components, we need
two computers with the bluetooth capability. So, I used my desktop PC
which is connected with a USB bluetooth adapter and a laptop which has
bluetooth capability. Both are running Ubuntu 12.04 version. I performed following steps on the desktop PC which is going to run the Manager component.
First of all, download Antidote 2.0 version from their website. After uncompressing it to somewhere in my Ubuntu 12.04 desktop machine, I started the installation process. When I try to install it, there were many error messages about missing packages in my platform. So, before installing Antidote, we have to issue following commands on the terminal to install those required package tools.
sudo apt-get install automake
sudo apt-get install libtool
sudo apt-get install libdbus-1-dev
sudo apt-get install libdbus-glib-1-dev
sudo apt-get install libusb-1.0-0-dev
After completing their installation, we can proceed to install Antidote. Move into the antidote-2.0.0 directory from the terminal and issue following commands.
./autogen.sh
./configure
make
sudo make install
Now Antidote installation on desktop machine is complete. I have to follow the same steps to install Antidote on the laptop but first I have to fix a little bug. After downloading Antidote to the laptop which is also running Ubuntu 12.04, I opened the file "antidote-2.0.0/src/communication/plugin/bluez/plugin_bluez.c" and commented the line number 1455 which is a call to "channel_connected" function. This is required to solve some problem occured by Agent program in Antidote. I found this solution in this mailing list discussion. After doing this little fix, then followed all the above instructions to install Antidote on the laptop computer too.
After completing the installation, we can try sample applications. In the IEEE 11073, there are two basic components which are Agent and Manager. Agent is the medical device which generate health-care data. Manager is a user device which collects the data from Agent device and provide some useful functionalities for the user such as visualizing and storing data or send to some other remote application. Manager device can be a smart-phone or a tablet, while Agent device will be a medical equipment which generate data. Agent and Manager communicates to each other via Bluetooth HDP profile. In our case, we are going to run a simple Manager program on desktop computer while the simple Agent program will run on the laptop computer(which has the bug fixed Antidote). Agent will send just dummy data to the manager to demonstrate the functionality.
First of all we must run the manager. For this purpose move in to the "antidote-2.0.0/src" directory from the terminal of desktop computer. Now issue the following command.
./healthd
Our terminal should now print some stuff and then hangout. Open a new terminal or a tab and then move into the same directory. Now issue the following command.
python test_healthd.py
That healthd program and this python script are collectively going to give us the Manager functionality. Now its time to run the Agent on the laptop computer. Before that, turn on wifi in both computers and then pair them. Now in the laptop computer, open a terminal and move into the directory "antidote-2.0.0/src" and issue the following command. Note that we have given the bluetooth address of the desktop computer running Manager as a parameter to this sample Agent program.
./sample_bt_agent 00:19:0E:11:9F:5D
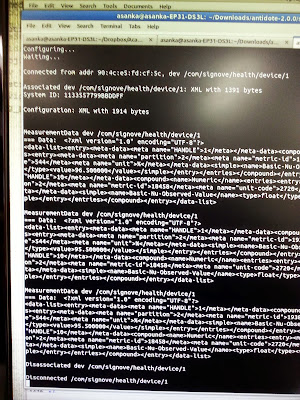
 After issuing this command, sample Agent start to communicate with the Manager program via bluetooth HDP with the help of IEEE 11073 protocol. On the desktop computer where the test_healthd.py script is running, you will see some output like the following which shows that Manager has received some dummy data from the Agent. When we get this output that means our Agent and Manager are working fine.
This is the very basic level of Antidote Agent and Manager for testing. There are more things for me to learn about Antidote library.
